So in order to attract readers back to reading my blog as I re-enter the blogging scene (Like for the 3rd time) I have decided to share with you guys my secret art of PHOTO EDITING. Its pretty easy. Like seriously you just need a few steps and you can finish editing like one of it in 10mins? Like the expert = ME. HAHAHAHA
So today I'm going to teach you how to edit your photo like mine. Looking more professional and perhaps you can say Studio type of photo editing.
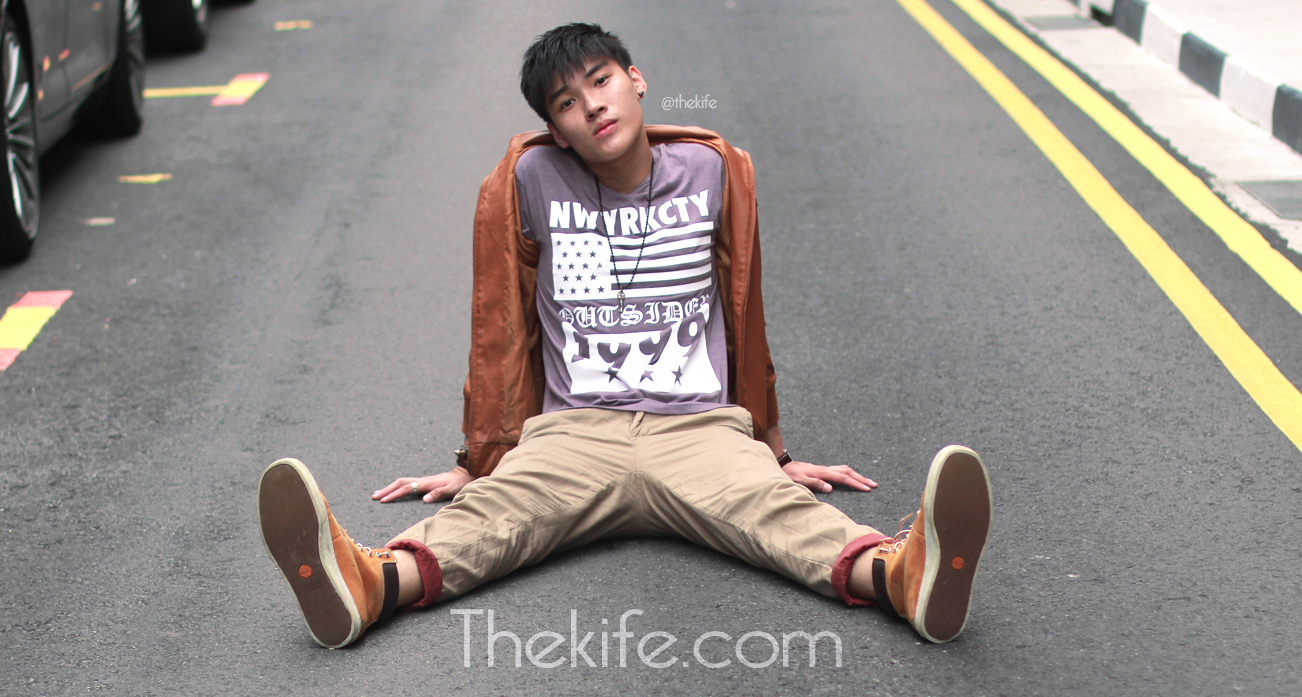
This will be the end product of the day:

I've got a lot of people asking me questions like eh kife:
Where did you take this photo?
Which studio you went to?
Who is your photographer?
And my answer is:
I TAKE THEM MYSELF IN A SMALL ROOM AT HOME.
Its not that I take it very professionally. It all has to be done with loads and loads of editing. Like easy steps of cos. and to really get this you guys you should try out these steps.
Before I begin just a quick write up.
Remember... You don't have to be afraid of what others say. since you're posting pictures ONLINE. Why the hell care about others thinking that you photoshop your photos? Even if you never, TRUST ME humans instinct, They would BELIEVE THAT YOU DID. So what's the point of defending yourself when you never photoshop SOME when they already judge and sentence you to ' 002 Death Penalty : in guilt of using Photoshop '

Here it all begins with of cos a photo that you just took. Lighting wise if you don't have a ringlight like me its okay. just look this looks like any other photo that you can take at home.... (Of cos I already removed my blemishes and cream on my face plus eyebags)
Step 1

Using the brush tools in Photoshop, Cover the background.
Create a new layer (At the right side of Photoshop)
Press B to switch mode to Brush tool (Check that you're using Soft brush)
Color Pick the nearest background color of the wall by using ALT + CLICK (while in brush mode)
Paint off the the parts from the furthest to the closest you can get.
Step 2

To clean of the edges of the background nearest to you, you have to use the HARD BRUSH.
Windows >> Brush Presets >> TADAH BRUSHES.
Crop away the background with the same steps from Step 1 to distinguish yourself from the background.
After this step your photo will look as if you took it from a plain white background.
Step 3

Now Switch to using Photoscape
With Bloom mode, Amplify the brightness of your photo.
In this case I turned the Level to 45% (By default its 30%)
Step 4

Go to Film Effect and Choose an Effect that you like.
For my case I chose Cinema - Low
Do not choose anything higher than Low go by your institution. If you think Middle won't make your photo look too wash out, by all means choose Middle.
Step 5

Go to Bloom Effect again
This time round use Level at 30% and click okay
Reason why for the second bloom is to harmonize the picture after the film effect
You don't want your photo too look too fake with ' Effects '
Step 6

Click bright Color and Darken the photo a bit... Like literally a bit. Trust your judgement!
Step 7

Now open Picasa
Use the effect called Focal & B&W
It add on a stylish finish off to the white/grey background and look matte.
Step 8

Now back to using Photoshop
CTRL + L = Levels
Brighten up your image and as the same time darken it out so that you can see contrast between the light and dark.
*Additional step
CTRL + Z to undo and redo so that you can see the difference of the lightning.
Step 9

If you're like me, hate YELLOWISH PHOTOS.... Then this is an important step.
CTRL + U = HUE/SATURATION
Change master layer tab to Yellows tab
Reduce the Saturation by a bit as shown in the photo.
STEP 9.1

This is a reverse process whereby you choose the change the yellow into the Master channel again
Then reduce the saturation.
The reason for this reverse process is because you will need to take away from yellow colors before you take away all the other colors that are left in the picture which is what Master layer stands for.
By turning into the Yellow Channel only colors who has yellow in their values will be changed whereas Master layer takes all the color that counts.
Step 10

CTRL + B = Color Balance
Depending on what kind of mode you want you can change the colors accordingly.
In this case I want a subtle yellow/brownish feel for the photo.
Step 10.1

Remember to Create a Layer of with the same photo before you do Color Balance
After adding Color Balance, Using Blending Mode (At the layer tab)
Change it to Color and lower the Opacity to 75%
You can see a slight change from the Original photo and with the layer of Color Balance on.
*Click on the eye icon at the layer to see the difference
Normally I would stop at this step...
But for the sake of this tutorial and for the sake of my female readers I added an ADDITIONAL/OPTIONAL STEP Which you might be interested.
Special Step
Using the Burn and Dodge tool.
Color out the Shadows and Highlights.
I did a chart for you to follow :

HAHAHA LOOK AT MY FACE. HAHAHA I pointed out the parts that you will need to highlight
For Shadows use the Burn Tool
For Highlights use the Dodge Tool
Okay bare in mind the strength of the brush keep it at 8-21% dont go higher or else you will look too burned or too fake.
So now for all the steps to accumulate


See the huge difference of the photo taken and edited.
And if you are experimental you can try on other styles so you will end up with different types of effects

To do this effect just take away Color Balance step. and use Soft brush with White Value and create big and small dots around the atmosphere.

For this effect, Just brighten more at the Levels part.

And to recreate this dreamy look. Just use the soft brush to cover the edges at the start than using the hard brush. Also At the level parts don't brighten as high as the other photos.
And tada with minimal changes I manage to come out with 3 other different feel.
Can you?
You can give it a try by saving my photo and do a test out here.
Concurrently you can read up my first tutorial on how to even out uneven walls if you don't have perfect smooth walls at home.
Smooth glossy wall photo tutorial
Hope you enjoyed this tutorial !
Thank you for reading :)
No comments:
Post a Comment